
")
Thorens Technology Guide
How to install a new Pick-Up Cartridge
Thorens customers intending to buy a new pick-up cartridge often ask us: Will this combination work? Will it sound good? Will I be able to install the cartridge on my own? And our usual, friendly and clear reply is: yes, yes and yes again!
Changing the cartridge is not an insurmountable task; it just requires a little care. A new cartridge will give you more precision, better sound. It’s a win-win situation – provided you have a good base to build upon. We’re proud to provide that base with high-precision turntables and tonearms that will give you many years of sterling service. Perfect partners for the best pick-up cartridges that money can buy.
Step 1 - Setting the Table
There are three things you need before you start:
time, a decent workplace and a few tools.
Time:
The entire procedure will take about half an hour.
Workplace: You will be handling small, fragile plugs and adjusting tracking forces of a few grams. Doing this hunched over a rack will neither be good for your back nor will it help you achieve precision. The turntable should therefore be placed on a level surface, ideally on an empty desk.
Tools:
You will not want to, and do not need to, access anything inside the turntable. You will be working mostly on the tonearm, with tools that can be found in any home. If you don’t have the right tools to hand, many cartridges come with a set of screwdrivers. Failing that, you can get the right tools in a local hardware store. You will need the following:
-
a pair of pliers. These needn’t be high-precision instruments. A pair with fine tips and a good grip that will let you feel how much pressure you exert will suffice.
- a screwdriver. A standard phase tester will be perfectly suitable. A screwdriver with a rotating head is even better since it allows you to exert just the right amount of pressure while turning the screw.
- an Allen key. A suitable key is usually supplied with the cartridge (if the cartridge is designed to be fixed to the tonearm by means of Allen-type screws; some manufacturers may choose other methods). The holes drilled into the tonearm are standardised and will accept most cartridges. Equally, the holes in cartridges are standardised. The only differences you will encounter are those between screw heads. If you have the choice between Allen or slotted heads, we generally recommend using the former as they are better to work with. Slotted screwdrivers can slip, whereas the hex shape of Allen keys will be more secure.

The following are optional, but can be useful:
- a stylus gauge (to adjust the vertical tracking force)
- a cartridge alignment protractor (to adjust the angular offset)
Step 2 - Breaking Free
Installing a cartridge starts with freeing it from its packaging. A word of caution: you are holding the most fragile of all hi-fi products in your hands. And its most fragile elements are the stylus, the cantilever which holds the stylus, and the thin wires. It’s best to avoid jerky movements and excessive force. At the same time, you shouldn’t be overly timid.
The cartridge body is robust and designed to be held between your fingers. Don’t worry about gripping it tightly.
If the cartridge is fitted with a stylus guard, leave it on as long as possible during the installation process.
Cartridges without a stylus guard, such as the Benz ACE cartridge pictured in the photo, require special care.
This type of cartridge will be fixed to the packaging, usually by means of screws. If this is the case, hold the cartridge between your fingers while you loosen the screws with the other hand.


 A closer look: Cartridges are often supplied with a number of screws for different headshell strengths. If the headshell is comparatively thick, longer screws should be used to ensure that the cartridge is fixed securely.
Many manufacturers also include washers made from plastic or high-grade Teflon. These should not be overlooked as they can be quite useful: they can dampen vibrations and, most importantly, ensure that the cartridge fixed securely.
Step 3 – Practical Considerations
In the next step you need to either screw the cartridge to the headshell or attach the wires to the cartridge pins. Which to do first is a matter of practicality.
In our illustration, we first screwed the cart to the headshell. The Thorens TP 92 tonearm leaves enough space at the rear of the headshell and uses flexible tonearm wires so that the cartridge pins are easy to access.
However, if the space between the headshell and the arm tube is tight, as might be the case with other tonearms, it is good practice to first attach the tonearm wires while the cartridge pins are still accessible and there is little danger of exerting too much force on them.
Matching pins and cables
Manufacturers throughout the world follow a convention that makes it all but impossible to match wires and pins incorrectly. Installation is particularly easy with cartridges that have colour-coded pins (one example is the Benz ACE cart pictured here).
Carts without colour-coding will have letters and symbols to aid installation: “L” and “R” stand for the left and right channels, respectively, and the “+” and “−” symbols are self-explanatory. Sometimes you may see an “H” for “hot” (i.e. “+”).
Green: right channel, minus
White: left channel, plus
Blue: left channel, minus


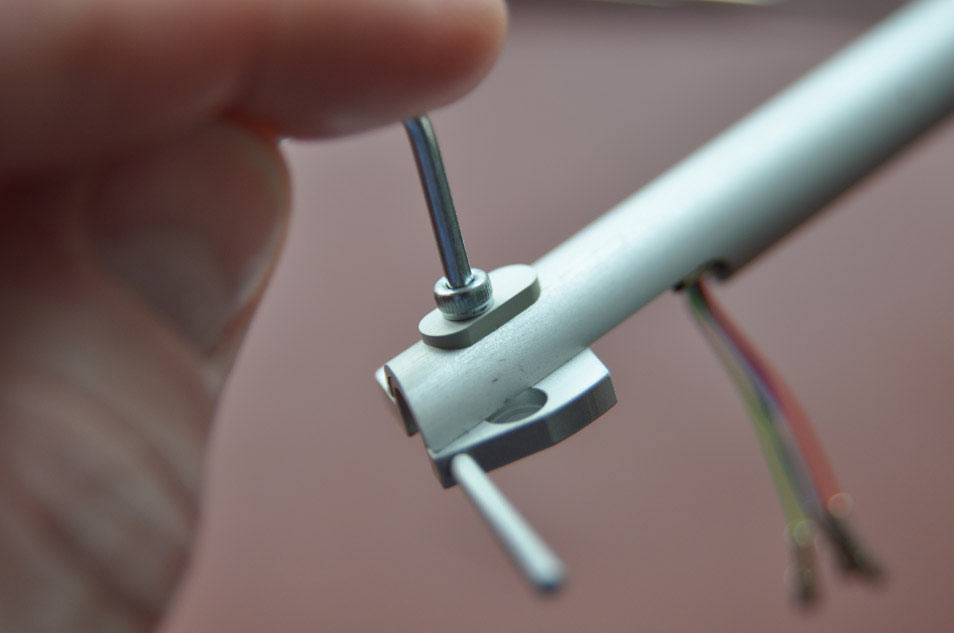
Step 4 – Making Contact
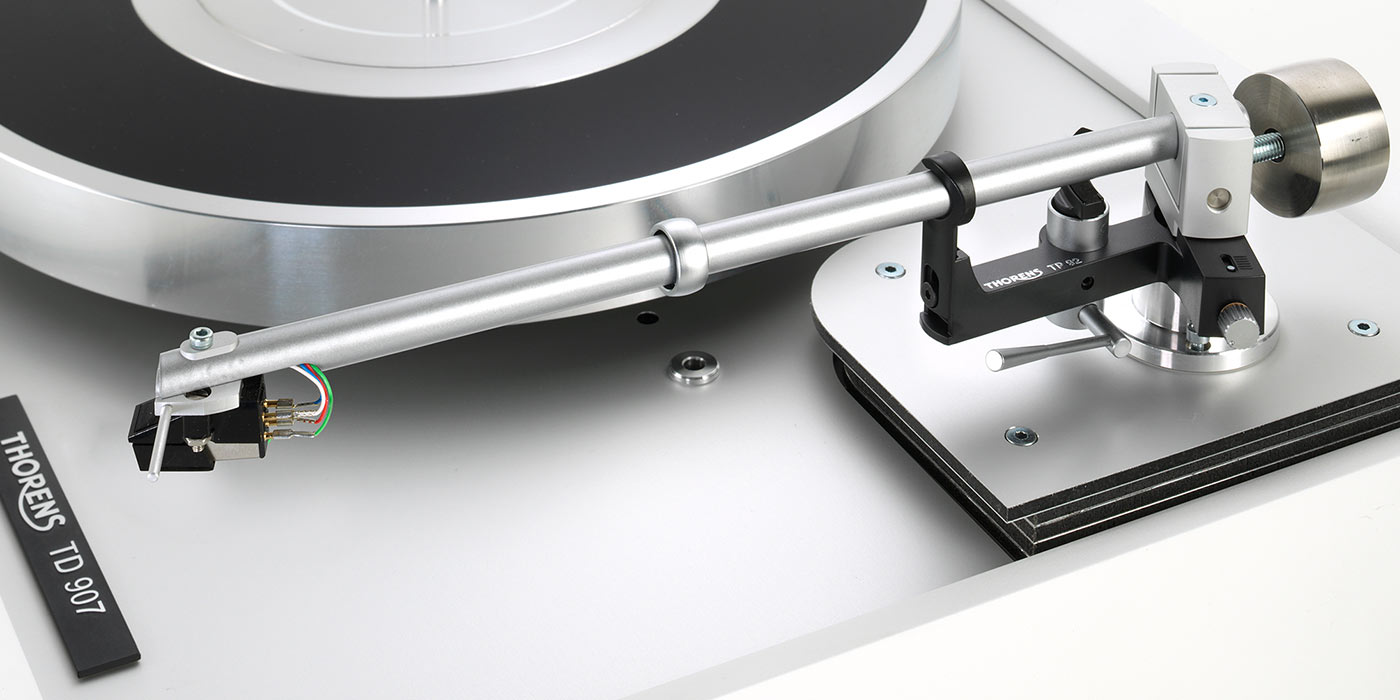
Headshells come in all sorts of shapes and sizes. They always have to accommodate at least two screws, but there may be fixed holes or slots, and the headshell as such may be fixed or removable. There are many variations, but all of them follow established standards. The TP 92 pictured here makes the installation process easy, thanks to its removable headshell. Use an Allen key to loosen and remove the headshell, attach the cartridge with the supplied screws and re-attach the headshell.
Note: All of the screws used here work with a high degree of precision. You should not feel any resistance or need excessive force when tightening them.


Step 5 - Precision Work
If there’s one critical element of cartridge installation, it’s attaching the thin wires to the tiny pins – with just the right amount of pressure. The cable lugs shouldn’t sit too loosely on the pins. Normally, changing carts does not require any adjustment of the lugs. However, sometimes it will be necessary to decrease a lug’s diameter. Gentle pressure with a pair of pliers will do the trick (the important word here is “gentle”).


Step 6 - A Matter of Balance
In most cases, a new cartridge will present a new load for the tonearm, requiring readjustment of the vertical tracking force. To do so, first open the stylus guard or remove it and lay it to one side. Then balance the counterweight against the tonearm.
The ideal tracking force is set either with the help of a dial gauge that is attached to the tonearm or, in the case of the Thorens TP 92, by giving the counterweight a few turns towards the arm tube. The cartridge manufacturer will have stated the ideal tracking force either on their website or in the setup instructions included with the cart. Enthusiasts may wish to experiment through listening in order to find the ideal value for the particular cart, deck and tonearm combination. Forces of around 2 g or less serve as a good starting point.
Little helper: Thorens offers a stylus gauge. Simply lower the stylus into one of the grooves – the balance moves if the indicated tracking force is exceeded.
Note: This is a great opportunity to check whether the tonearm is parallel to the record. Lower the stylus onto the record and look at the turntable from the side: the distance between the arm tube and the record’s surface should be the same from the tip to the rear bearing of the tonearm. If this is not the case, many tonearms can be raised or lowered by means of an Allen screw in the mounting collar. If you are unsure about adjusting the tonearm, ask an expert for help.


Step 7 - Lining up
First you need to set overhang by moving the cartridge forwards or backwards along the arm tube. With the TP 92 in our illustration, this is an easy task: loosen the Allen screw at the top; place the cartridge alignment protractor on the stationary platter (the red arrow on the protractor should be pointing towards the tonearm pivot); carefully lower the stylus onto the protractor – it should land right on the thick black arc line, regardless of where you lower it between the points marked A and B. To adjust overhang, gently move the cartridge forwards or backwards. When you’ve found the right setting, re-tighten the Allen screw.
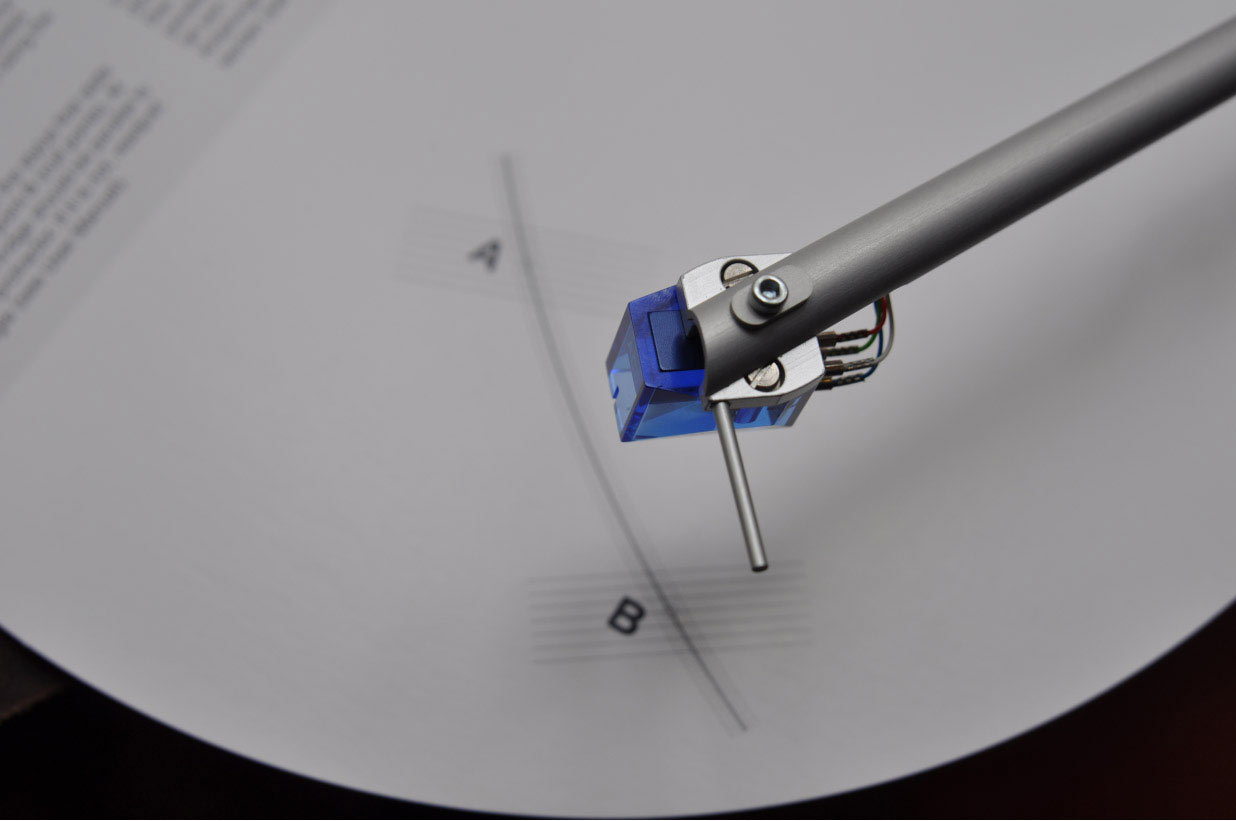


Step 8 - The Right Angle
The second adjustment that is made with the help of the alignment protractor is the angle at which the cartridge sits relative to the record groove, the offset angle. With the TP 92, the ideal offset angle is already set by the headshell, but there is a little bit of play for fine-tuning. Many other tonearms will have more play.
Lower the stylus first onto point A, then onto point B. In both cases, the cartridge body should be parallel to the lines on the protractor. It’s best to look at the cartridge both from above (bird’s eye view) and from the front. Once everything is symmetrical, re-tighten the screws. Congratulations – setup is complete!


Step 9 - Room for Improvement
Did we say complete? Perhaps not quite. There is still some room for fine-tuning, which can be fun and interesting, particularly since you will have to verify your results by listening. At this point, the sound should already be impressive. But remember that you need to give both yourself and the new cartridge some time – many carts only begin to truly shine after several hours of run-in time.
Choose one of your favourite records, preferably a dynamic recording. The attack of a grand piano note should be as clear and spacious at the beginning of the record’s side as towards the end of the side. If you think there is room for improvement and you feel confident enough, try experimenting further with the settings we have discussed, particularly the offset angle and the vertical tracking force.
And last but not least, there’s the anti-skating force, the force that compensates the tonearm’s tendency to move towards the centre of the platter. It should be set at the same value as the vertical tracking force – however, sometimes better sound quality can be achieved by using only 75 per cent of the value.
Step 10 - Help at Hand
In any case, if at any stage you become stuck along the way or have further questions, do not hesitate to use the expertise of your Thorens dealer. He or she will be happy to help!